home decor ideas

Sabtu, 31 Oktober 2015

Diwali Ki Shubhkamnayen: 1.11.2007

Dust that old spice box, bring out that antique jewellery box your mother gave you, better still if it has some compartments in them.

Display it on your center table or that coffee table in your drawing room where you welcome your guests for Diwali.

Fill each compartment with dry-fruits, sugar candies, chocolates, take your pick:-) Drop a tiny tea light candle in one of the slots and see the festive glow it it brings into your home and on the faces of your guests:-)

(Images & ideas by Arch, feel free to get inspired and link to me but if you want to use my photographs for some other purpose please send me a mail.)

Jumat, 30 Oktober 2015

doily patterns...

Tealight candles adorning our entrance...
Tealight candles have become a big part of the Diwali illuminations in many Indian homes. I love using these along with the traditional oil diyas.

I wanted an interesting background to form a base for these candles. Coasters were one option but I zeroed in on traditional 'Kolam' stencils available widely in stores that sell 'pooja articles' or stalls near temples.


The patterns remind me of doilies that my mother used to crochet during my childhood:-)

A lotus shaped kolam stencil...

Some interesting design stencils...

(images by Arch)

Diwali Ki Shubhkamnayen: 31.10.2007

Diwali is the time when major cleaning, painting, sprucing up is done and homes are transformed into a special abode for Goddess Lakshmi (Goddess of Wealth)

There is brightness everywhere. My Diwali routine includes taking out all my brass lamps, the simple brass diyas to huge Kerala Lamps.
Here is a simple idea that you can use as a center of interest on your dining table, infront of a picture of Goddess Lakshmi or at the entrance to your home.

Polish those simple brass diyas, place it in between the grooves of an egg tray (which you can pick up from any grocery store). Use any flower of your choice to fill up the gaps in between the diyas. Voila! You have a gorgeous centerpiece ready.


(Images & ideas by Arch, feel free to get inspired and link to me but if you want to use my photographs for some other purpose please send me a mail.)

Diwali vignettes Rang Decor style....

Just few frames of how I will be decorating our humble abode this Diwali. My colour palette seems to be gravitating more towards whites, creams, violet and silver.


Mercury votives add the sparkle to the festival of lights...


 Vintage finds and traditional silverware makes interesting combinations.

 Float some candles.

...and some flowers!

Most importantly let your creativity flow, enjoy the process and savour the glow and joy!

Have a fabulous time with your family and friends with loads of happiness and laughter!

Diwali Ki bahut Shubhkanayein!  

Happy Diwali all you lovely readers of Rang Decor! Stay safe! Sending loads of warm wishes from a cold Minnesota:-)

( Images and styling by Arch. They are copyrighted)

Diwali Inspirations...

With Diwali- 'The Festival of Lights' around the corner, I have been looking everywhere for inspiration to decorate my home. There are amazing, sparkly diyas & lamps available in the market, fancy gift packs of dry fruits & sweets, amazing packaging of chocolates and so on but I want to do something innovative, something simple, something beautiful, something traditional, something different.

So why look elsewhere? I keep sharing ideas from my home now and then, but this is the first time I have decided to share Diwali Decorating Ideas formally.

Some ideas & inspirations from my home to your home every single day from today to Diwali that is on 9th Nov, 2007. (Ok, I have said it!)

Now please be with me and do tell me what you think of this. While I try and share some inspiring ideas, the next couple of days...

Kamis, 29 Oktober 2015

Pinch a little...

I am referring to a technique used in pottery called pinching. It's a super simple way of making a clay pot. Here is a link to how you can make a pinch pot.
Recently we made it in my pottery class with coloured porcelain clay.

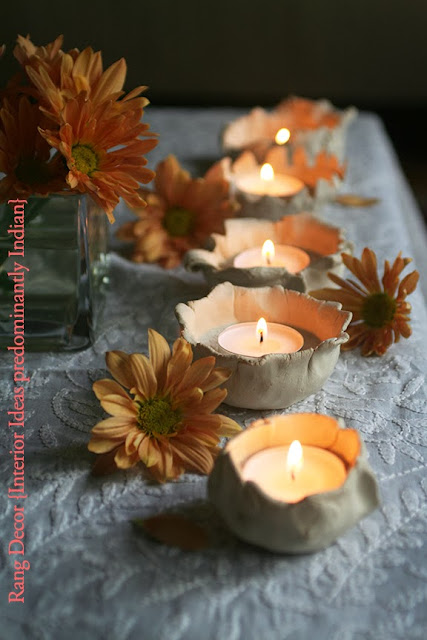
So I thought for this Diwali why not make pinch pot tea light holders? I remembered we had some Air-Dry Clay that we had used to make Ganesha this year. 
So quickly I made little clay balls that fit into my palm and made pinch pots that could fit a tea light. I loved the creamy white colour, so I retained it. 

If you like you can paint the tips or use coloured clay. 
 I moulded it in such a way that it gives a rustic, floral, petal-like feel.

 A peach and cream colour scheme comes together...

You can line it in a row or place it in a single tray with flowers.


Few readers asked about how to incorporate the fall decor accessories available here in the US.
Few felt/foam leaves scattered around the pinch pot tea-light holders gives it an autumn appeal. Add mini pumpkins or winter squashes around the tea lights.

You can get your kids involved in making pinch pots and the clay dries quite easily.

Hope you liked this simple DIY idea for Diwali. 

Have a beautiful Diwali filled with warm glow and happiness!

( Images and styling by Arch and is copyrighted)

Rabu, 28 Oktober 2015

Tea Cart Sheet Music Revamp


Although I must admit I don't actually have any tea trolleys in my home (hmmm, that might need to change) I do just love them. So when I spied this little guy on the curb I knew he'd be coming straight home with me.


(Disclaimer: This is my parents garage. If I was lucky enough to have one (a garage that is) the cans of paint would probably be arranged in order of colour gradient - yes, sad but true. No offence Mum and Dad, you guys know how much of a neat freak I am anyways!).

I gotta say that he did kinda just sit around for a while at first. I was waiting for him to 'tell' me just what he wanted to become. Eventually he did lean over and whisper in my ear; 'Make me a girl. I wanna be all dressed-up in vintage cream and sweet sepia sheet music'.
Well, who am I to argue?

Sooo, I got to cleaning and sanding. Priming, painting and glazing. Decoupaging and sealing.
And eventually she emerged....


I love the original rusty old castors.


For that added little touch I covered the dowel hand rail with sheet music too.

I think he, oh...I mean she is much happier now!

Before

After

Hope you liked this little project.


Selasa, 27 Oktober 2015

The Nursery Reveal!


Before Charlotte actually out-grows her cot I thought I'd better finish off her room! Well, for that reason and also cause it's about time I finally shared it on my blog.
Of course it would have been completed four months ago before she actually arrived in the world if it hadn't been for that pesky eight week hospital sojourn (giving it a sweet name derived from old French makes it sound so much more appealing!).
It's a neutral space with nothing too flash or poppy so for those who have been waiting (far too patiently!) for the reveal I hope its simplicity doesn't disappoint :-)

BEFORE


The nursery was originally our unfinished study/junk space/I-collect-too-much-furniture-and-have-nowhere-else-to-put-it room. It's teeny tiny, about this big...


...which made it a tricky little space to decorate (and photograph).

If you're new here and feel so inclined you can catch-up with the previous nursery posts here which outline some of the design process and projects to this point.

AFTER

 To give the room some dimension, charm and crispness we dressed the walls with simple white board and batten. I didn't do a tutorial on this (mainly because there are already a squillion out there though also because we kinda just made it up as we went along). I will say however, that if you're considering a similar treatment it's actually pretty straight forward - especially if you're willing to call spak your friend :-)


To save extra painting (and because it's already nice and neutral) we decided to retain the original colour on the upper walls. It is Dulux Chalk USA as per the rest of our house.
The generic old wardrobe doors had to go though rather than trash 'em we decided to rehash 'em, offering salvation in the form of chalkboard paint and custom alphabet decals.

BEFORE

AFTER

The process was similar to how I transformed the built-in doors in my master bedroom here.
We just removed the doors, bottom rail and fascia (which simply unscrewed) took them all outside and painted the metal beige areas with black enamel spray paint. Once dry, we gave the doors two coats of chalkboard paint. After a few days curing time I attached alphabet decals which I had custom made in Poor Richard font by Leen the Graphics Queen. They remind me of a classroom blackboard - I really love them!


I picked up the cot (crib) off eBay for just $40.

BEFORE

I was umming and ahhring for ages about what colour and finish to go with though eventually settled for a warm grey.
I used organic acrylic (so it's safe when Charlotte decides to start munching on it) and mixed up the colour myself. I finished the cot with a subtle glaze and light distressing (so it will only add to the character when Charlotte decides to start munching on it!).
I also replaced the plastic castor wheels with an antique porcelain set taken from an old Edwardian chair.

AFTER

For some weird reason the window in the room sits slightly to the right so I hung the curtains centrally, covering the frame to create the illusion of symmetry.
Of course I needed a blackout solution and the linen drapes from IKEA were merely light filtering so I also used a textured blockout roller blind.

I knew from the get-go that I wanted an original antique to use as the change table. Eventually I found a reasonably priced gorgeous old mid 1800's cedar chest of drawers on eBay. I adore the patina and proportions. We keep all the change-time paraphernalia in the top drawers so it's completely accessible when needed though otherwise kept neatly hidden away.

I posted about mt eBay rocking chair mini makeover here previously. I decided to enhance it a little further with some subtle burgundy grain sack stripes.

BEFORE

AFTER

The light fixture is a repurposed old zinc basket. You can read the full post and tutorial for that here.


The gallery wall was basically free. I wanted to create a quirky vintage feel so used a mish-mash of frames (some I already owned and others from op shops)...


...and filled them with free printable art I found on The Graphics Fairy, Vintage Printables and the NYPL Digital Library.


The lamp stand is a repurposed brake fluid drum! You can read about it in this previous post.

BEFORE

AFTER

I made the mobile using hand-carved timber birds, laser-cut metal leaves and some twigs from my backyard. You can read the tutorial for it here. It adds a lovely organic feel to the room.


And to finish here are a few side-by-side B and A's just for comparisons sake.

BEFORE

AFTER


BEFORE

AFTER


BEFORE

AFTER


BEFORE

AFTER

Hope you like it!
I'm taking Charlotte's willingness to sleep peacefully in there as her sign of approval :-)

Linking up here.


Source and Price Guide
Linen Curtains: IKEA $90
Textured Blackout Roller Blind: Lincraft $80 (on sale)
Antique Chest of Drawers: eBay $300
Cot: eBay $40
Rocking Chair: eBay $100
Lamp Stand: DIY Project $5
Lamp:  Sokol $110 (wholesale)
Cane Storage Baskets: Kmart $14
Wire Basket Ceiling Light: DIY Project $15
Wicker Waste Basket: The Reject Shop $10
Fitted Ticking Cot Sheet: Target $15
Throw Blanket: Spotlight $20 (on clearance)
Bird and Twig Mobile: DIY Project $15
Custom Alphabet Decals: Leen the Graphics Queen $14
Sheepskin Rug: Gift
Sunburst Mirror: Repurposed from Master Bedroom (originally from Oz Design $60)

Project Guide
For details relating to the Cot Makeover, Gallery Wall, Wardrobe Door Makeover and Board and Batten Treatment please refer to the post above.