home decor ideas

Tampilkan postingan dengan label DIY. Tampilkan semua postingan

Senin, 07 Desember 2015

Nature is the art of God.

Nature is the art of God. ~Thomas Browne

Walking into my terrace this winter morning, I found these dried fern leaves dangling from the pot. Gently pulling it out, what do I see?
Two beautiful christmas trees!
peace4

peace3

peace2

peace1

I marveled at the fact that to bring the festive christmas spirit into your home you just need to turn to Mother Nature and she sends these little treasures that spread magic!

Enjoy the festive season everyone!

Turn a Cabinet into a Hideaway Home Office

Our hive has three bedrooms.
The master (which you've probably already seen - if you're new here or you missed that makeover you can check it out here), along with two other teeny ones currently awaiting revamps - one of which is more of a glorified cupboard (okay, so I'm exaggerating slightly though you get my drift - they are SMALL).
So anyway, the slightly less small of the two currently holds, amongst many other things, this big free standing TV cabinet (found on eBay for around $100):


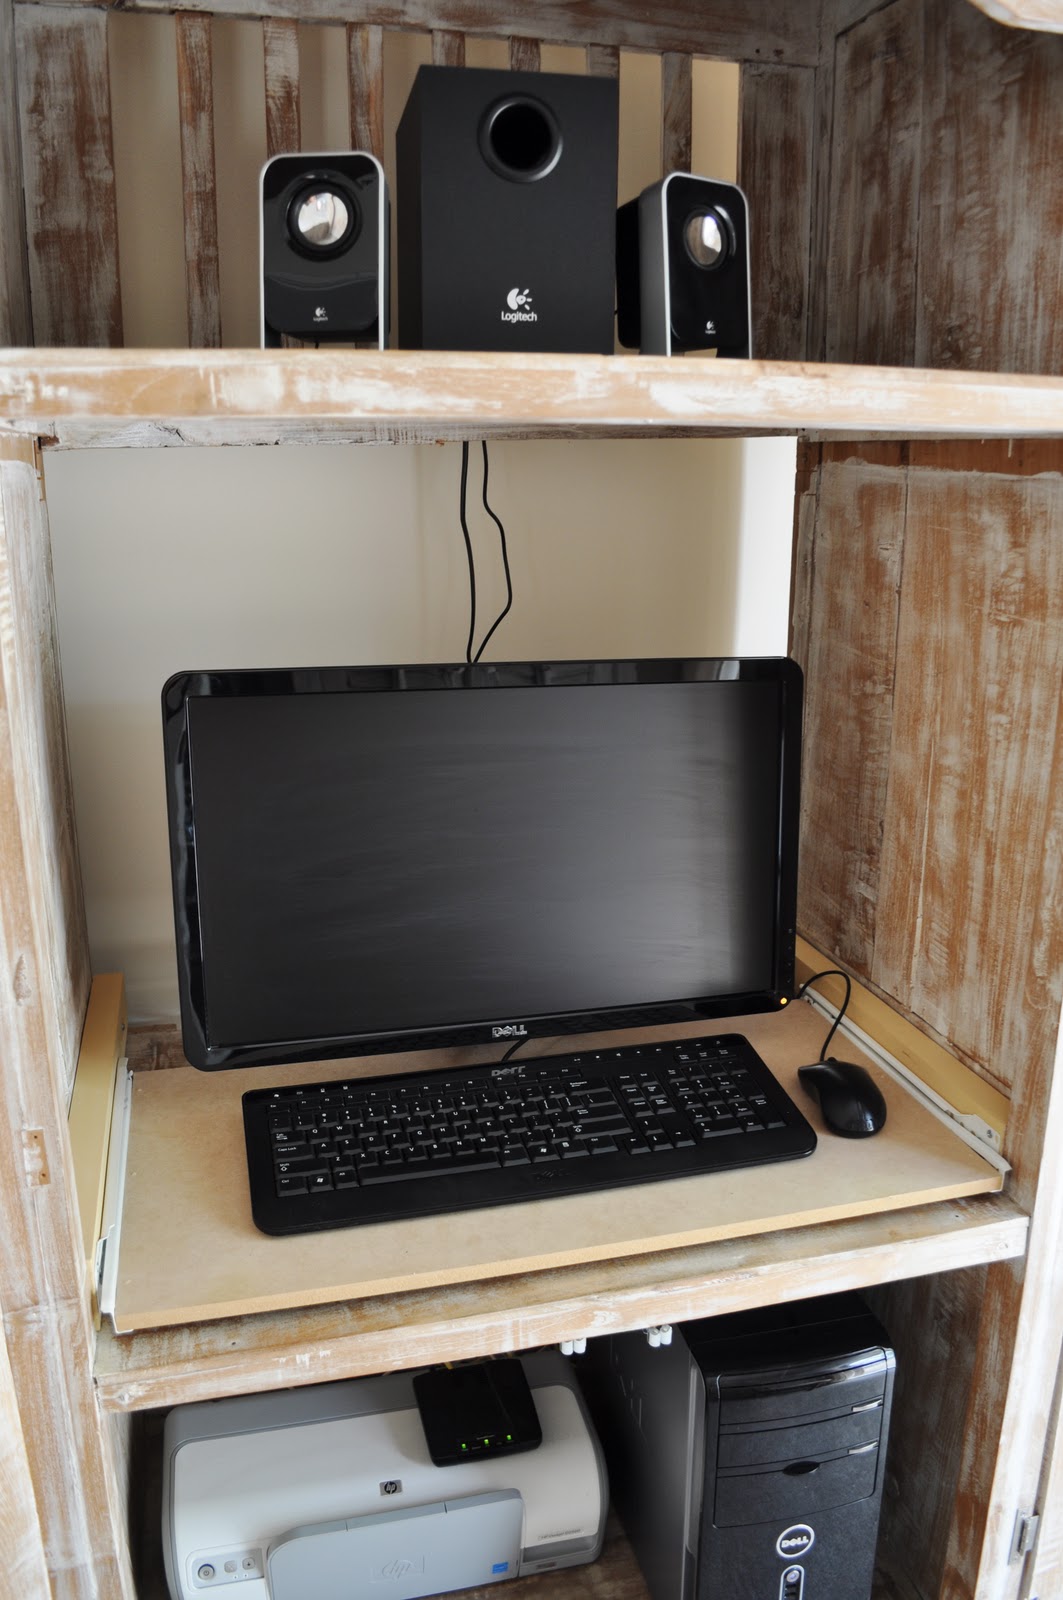
Because instead of just a neat little laptop we have a hulking great computer with a massive monitor, printer, sound system, hard-drive back-up, broadband modem, etc, etc, there are a tonne of power cords and lots of poxy black plastic I'd rather hide away than have on show so here's what's actually living in that TV cabinet:


I know, I know, not too pretty at the moment - see what I mean about the cords? - though I do have beautification plans.

We've been using the computer like this for a while now, though to be honest, not very comfortably; the shelf heights are a bit awkward so you need to lean right over to reach the keyboard and mouse.
Well, I'm pleased to say that's finally changed thanks to the installation of this rolling shelf:


Again, still awaiting beautification though currently practical if nothing else!

I've always found purpose-built computer cabinets can be pricey (and usually lacking in character) so here's a quick little tute covering the basics of how you can turn any cupboard/cabinet/robe/closet into your own mini hide-away office.

Step 1
Find a cupboard. Almost anything will do. Just make sure it's big enough to house all your bits and pieces and really deep if you also want to leave a chair hidden in it. Like I already mentioned, my cupboard was originally a TV cabinet I bought off eBay for around $100.

Step 2
Install or remove fittings as required. I was lucky to already have some shelves in place though it's easy enough to add your own if need be. 

Step 3
Install your keyboard shelf. Usually this would be hidden under the monitor shelf though based on the height of the existing shelf in my cupboard it needed to sit on top.

Because my cupboard has recessed sides, I first screwed (counter-sunk) and glued in some timber spacers:


Next I attached the exterior drawer slides:


These are just standard roller drawer brackets you can buy from the hardware store for around $10 a pair.

I then measured the depth, length and height my keyboard shelf needed to be and had a piece of MDF cut to size at the hardware store. I attached my MDF to the interior drawer slides by screwing it in from the bottom. To finish I simply inserted the shelf inside the exterior brackets:


Closed....

....and open.

YAY!!! We can finally comfortably reach the components!

Step 4
Make your new home office beautiful (and user-friendly :-)

Okay, I already admitted I'm still yet to complete this step though I do have some plans. 

Ready Made

Better Homes and Gardens

SUNSET Magazine

Pottery Barn

1000 Decorating Ideas Magazine 2007

Lowes

Jem and Onyx

Unknown

Pottery Barn

Apartment Therapy


And thanks sooooo much to everyone who responded to my menial call for help from my previous post. I'm still getting around to contacting everyone who emailed or left a comment so please know I haven't overlooked your kind willingness to help :-)
You guys truly rock my socks!


Sabtu, 21 November 2015

DIY Transfer Decal Tutorial

Sure, there are a heap of different embellishing methods out there though did you know you can make your own custom, professional-looking, easy to use decals at home with no expensive outlays, time-consuming crafting or specialty equipment?


All you need is some waterslide decal paper and a printer (plus a cute design of course!).

Okay, that may have just sounded like a bad infomercial though I promise no-one is paying me to sprook the praises of this product. I just really like it.
However if you are in the waterslide decal industry donations won't be frowned upon - just kidding of course :-)

Anyhoo, let's get started....

For my graphic I'm using some simple numbers I just designed in Word though you could get fancy with Photoshop, find a graphic on-line or scan something in.
I got my decal paper here from eBay. Make sure you get the clear paper and either inkjet or laser to suit your printer.


Yes, those are my ugly kitchen tiles you can see beneath the plates. I will get around to making over my kitchen one day!

I really love the professional finish, ease and graphic flexibility of this method. Anything you can design you can use to embellish and this method works on all kinds of materials (glass, timber, metal etc.) so you can think big. You can even design (or purchase) over-sized digital graphics then print them in sections to create large scale images for big surfaces such as table tops.
The possibilities are almost unlimited.

I know this isn't an earth shattering technique though I've rarely seen it used so just thought I'd share.

Linking up here.


*UPDATE*
You can easily find the decal paper on eBay.
Just do a search for "waterslide paper" or "decal paper".
Make sure you get the clear paper if you want a transparent background and either the inkjet or laser printer compatible one to suit your needs.


Jumat, 16 Oktober 2015

Bird and Twig Nursery Mobile


When I woke this morning I noticed a soft golden glow creeping in from beyond my bedroom curtains and when I peered out the window saw the tree limbs dancing in the type of gentle breeze which makes you want to hang fresh white sheets on the clothes line. It was one of those mornings which reminds you of childhood holidays and made me think that Spring has finally sprung here in the lower Southern hemisphere - yay!

Just the motivation I need to finally shorten my looong 'to do' list - starting with the nursery of course! Though whilst it waits for some final touches before the full reveal I thought I'd share the latest addition - a sweet bird and twig mobile.

I had lots of different ideas for the mobile though eventually settled on something with a slight organic feel and little touch of whimsy.

I found some charming hand-carved birdies, which I painted musk pink, and a selection of filigree leaves on Etsy.


And I picked up two twigs from outside my back door (well, that's putting it simply to be honest. It actually took me a good half hour to make my final selection! Being surrounded by gum trees I guess the choice was overwhelming!).

Before I attached my birds and leaves to the twigs I used little round eye screws and fishing line to hang the twigs how I wanted them.
 I did this first to determine their natural horizontal position (thus knowing where to place the birds so they were upright and the mobile stayed balanced). As an extra precaution I also tested the birds positions with blu-tac before I adhered them with hot-glue for good.
I know this may sound fussy (and, yes, I am fussy :-) though it was actually a real pain getting everything aligned properly. It all needed to be pretty precisely weighted and whilst I'm sure there is probably an easy way to do it, I sure as heck couldn't figure it out! It just took trial-and-error and by the end I did almost grab the whole thing, screw it up in my hands and throw it in the air (almost).


To finish, I simply hot-glued on the filigree leaves in little sporadic clusters - that part was easy.


Linking this project with some of these parties.


Kamis, 15 Oktober 2015

Make Your Own Throw Rug


I gave up my search for a beautiful natural linen throw blanket a while back now. It wasn't because I couldn't find one for a reasonable price mind you, it was cause I couldn't find one at ALL (though if I had I'm sure it would have cost a pretty penny anyways).
From the get-go I have wanted to include a linen throw in my bedroom make-over.
Soooo, what does one do when said desired item seems only to live in one's own mind?
Answer: one makes said item themselves (and no doubt saves some cashola in the process).

 Step one; find some gorgeous linen you can't resist rubbing on your cheek with a price tag that doesn't make you sigh in resignation.
I searched high and low until one day, whilst not even looking, I stumbled upon some (if you're in Australia, I found it at Spotlight, yes people...Spotlight!).


Even though no-one else in the store seemed too interested in my linen, I must admit that when I first spied the bolt I looked around kinda nervously, made sure the coast was clear then casually moseyed on over, so as not to drawer attention, before greedily snatching it up before anyone else could.
A little crazy, huh?

Step two; buy some snug backing so your throw will feel and look all nice and cozy. I was lucky enough to pick up some beautiful cashmere on clearance for $8 a meter.


Step three; cut your linen and backing to the size you want then sew them, right sides together, like a giant cushion cover leaving a small pocket so you can turn it in the right way.

Step four; Carefully hand-stitch the pocket up (or, if you're lazy and impatient like me, just cheat and use iron-bond hemming tape) then run a stitch line around the whole blanket one or two inches in from the edge to give a nice professional-like finish.


There was enough remaining linen to make a cushion for my bed too. I decided to paint some subtle grainsack inspired stripes on it.


I applied some charcoal craft paint with an almost dry brush to create a slightly faded effect.


I love it!

And guess what? I still have some linen left. 'Why should I care' I hear you say. Well....I recently skipped over to 1000 followers and as a big...


...am gonna create something (hopefully fabtabulous!) from the last of my linen to offer as a GIVEAWAY to all my wonderful readers.

Now I can't wait to actually get this linen goodness on the bed (as opposed to the guest room floor where it's currently patiently waiting alongside all my other bedroom stuff!).
I truly promise I'm nearly finished. Just a few finishing touches and I can show you guys already. Thanks so much for being patient :-)


Kamis, 08 Oktober 2015

Create a Faux Bamboo Window Shade

Remember how I was planning to use all these....
Ikea Curtains18984646
Blind9

....to dress up the one (yes, just one) window in my bedroom?

Well, it's all finally up and I'm really happy with how it turned out....eventually.
Sure, there may have been one or two 'measure once, drill twice' incidents and about three hours spent trying to work out how that darn bamboo blind was actually gonna stay up there and look half decent though it all came together in the end.

First up was the roller blind which I mounted on the window frame:

DSC_0021

As I've mentioned previously, we needed a blackout treatment and nothing really beats these guys for effectiveness and affordability. Shame about the looks though.

Enter...solution one; el-cheapo IKEA curtains:

DSC_0044

I love the simplicity of white hidden tab-top drapes on a narrow black rod. I hung these as near the ceiling as possible to give the illusion of height and they work really well to conceal the roller blind's ugly plastic capping and cord whilst giving the room a soft hint of femininity.

Now, I could very well have left my window treatment at that. Because of where the roller blind is mounted it blends in pretty seamlessly, however, I had a vision (and how hard could it be to make a bamboo blind that's supposed to be attached to a window frame into a valancey thingo that hangs off a pole? Well, not hard at all after three hours of exhausting the 101 best possible ways to do it!).

I'll spare you all the trials and tribulations and just say that in the end I decided to cut the blind straight down the middle horizontally. I then removed the string and eyelets from the lower section and re-tied the binding thread (which sounds time-consuming though was quick and easy) so I had a plain piece of woven matchstick bamboo.

DSC_0058

DSC_0083

I know it may seem crazy cutting up a completely perfect blind though I had no intention of actually ever using it as a blind. I did initially check out the garden section of the hardware store for some type of bamboo screening I could use instead though couldn't find what I wanted - plus screening is way more expensive than a blind anyways.

I draped and wrapped my piece of bamboo around a cheap black curtain rod, playing around with a few different looks until I found one I liked (my blind is pretty evenly weighted though if you try this and find yours keeps slipping use some strong tape or pliable wire to keep it in place). Next, I simply hung it up on some brackets to conceal the roller blind.

DSC_0102

I love the rustic, natural feel it adds to the window.

I needed my bamboo valance to sit out over the roller blind though behind the curtains so used mid-length mounting brackets.

You can see how it all works in this pic:

DSC_0098

So, there you have it. A slightly crazy-lady way to create an affordable and attractive blackout solution for your window.

And the cost breakdown:
Roller Blind $60
Curtains $20
Bamboo Blind $15 (technically $30 but I only used half and still have the remainder I'll probably use somewhere else)
Rods and Brackets $20
Picture Blind Collage

Signature 2