home decor ideas

Tampilkan postingan dengan label Master Bedroom. Tampilkan semua postingan

Selasa, 01 Desember 2015

Enhanced Natural Timber Furniture

Before I began my master bedroom revamp I knew I wanted some rustic timber to keep the space warm and grounded however finding the right pieces to 'restore' rather than 'refurb' is easier said than done.
We all know how easy and effective slapping a fresh coat of paint on a piece of furniture can be - not only does it completely transform the feel of an item though it can also hide a myriad of sins. So, when you're planning on paring-back rather than packing-on, a little more care (and/or blind faith!) may be required.
With that in mind I set about sourcing some second-hand timber pieces which would eventually become my bedside tables and finally found these on eBay:

Deco Dresser ($60)

Kauri Pine Cupboard ($50)

Because my bed doesn't sit centrally on the wall I wanted two pieces with mis-matched proportions to play off the asymmetry of the room. I also needed plenty of storage.

Remember my inspiration board:

I knew I was dreaming when I included that apothecary style cabinet (lower right) though thought I could somehow transform my crappy old deco dresser into something with a similar feel so I got to work.

First I removed the mirror and handles then stripped back the old varnish using my secret weapon; commercial grade graffiti remover. Seriously, this stuff is awesome! You just pour a layer on, leave it for five minutes then remove it with some soapy water and steel wool. It's soooo much easier and faster than using a conventional paint stripper.
Okay, so admittedly I get mine from a friend in the industry though I'm sure it's available somewhere for domestic use (sorry I can't help more :-).

I next gave the dresser a light all over sand then stained it dark using a combination of walnut and black. I was careful to get the stain into all the imperfections in the timber to create the look of an aged patina. To finish I sealed it with three coats of danish oil then added some library pulls.

Before

After


The pulls were originally shiny polished brass so I coated them with some old gold Rub 'n' Buff to create a tarnished look. I thought it may not stick given how smooth the surface was though it hasn't budged. For something different rather than label each pull with a numerical digit I used french written numbers (un, deux, trois, quatre, cinq, six, sept, huit) which I simply printed off my computer onto regular copy paper. I then stained the paper with a diluted coffee mixture to give the labels an aged appearance.


My original plan with the kauri pine cupboard was to keep it as is though the blonde timber looked too unbalanced against the walnut of the dresser so I decided to stain it dark too which was fast and easy because it was already so bone-dry no stripping or sanding was needed. I simply mixed up some walnut and black timber stain then gave it three good coats. There were heaps of gouges and grooves in the soft timber from years of love (and neglect!) so, as with the dresser, I was careful to let the dark stain penetrate all the imperfections to create an aged-looking, time-worn patina.

Before

After

Linking this post with some of these parties.


Rabu, 18 November 2015

Distressed White Cabinet


Remember this little guy from my bedroom reveal?

Before

After

I reckon this early 1900's cabinet was originally some kind of kitchen dry store or food safe though I picked it up for $60 off eBay knowing it would be a perfect new house for all my shoes (oh, and some of Luke's too I spose - if I really have to share. Nah, actually I think he probably has more than me!).

This was the simplest of makeovers. I really wanted to retain the chippy, shabby appeal of the finish and although it might look fine as is in the before pic it was actually kinda dirty and cruddy so all I did to enhance its charm was give it a thorough once-over with the palm sander. Easy! I didn't even bother sealing it.


To finish I simply attached a couple of new el-cheapo tear drop handles from the hardware store.


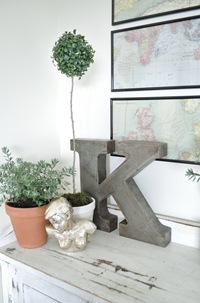
The adorning vignette features my gift wrap wall art, a giant gal 'K' and rectangular box from Provincial Home Living, terracotta potted rosemary plants, my DIY stick topiary (complete with real moss I pinched from the garden) and thrifted rustic bird cage and silver bust.


Sabtu, 14 November 2015

Time Management and New Ticking Sheets


*Warning: Real life stuff*
I know many of my readers visit purely for decorating inspiration so if you're simply interested in seeing some pretty pictures then scroll straight to the bottom where you can read more about this:


Anyhoo, in non-decorating related news, at the moment my days kinda go like this....

....get up and pull on the same t-shirt and trackpants you were wearing yesterday (and probably the day before too). Feed Charlotte, play with Charlotte, put her back to be (hopefully). Run around the house looking at everything that needs doing, making a mental list though not actually achieving anything. Pile all the dishes in the sink (though don’t actually wash them cause you don’t have time). Grab everything that’s lying around the house and put it in a pile somewhere too (because, once again, you don’t actually have time to put things where they belong though at least if they’re in a pile it creates the illusion of organisation). Sweep the carpet so the grain is all running in the same direction because you have some weird obsession with the grain all running in the same direction (remind yourself to buy loop pile next time so there is no need for “grain direction”).
Think of twenty things to blog about though don’t actually manage to blog about anything because taking pretty pictures and compiling meaningful posts takes way too long when you’re a part-time perfectionist. Feed Charlotte, play with Charlotte, carry her around all afternoon because there’s no way she’s going back to bed this time. Consider doing some laundry though just end up making more piles; washing, ironing, things to put away. Kiss your husband on the cheek when he gets home from work. Cook dinner, eat dinner, feed Charlotte, bath Charlotte. Sit on the couch for five minutes and stare zombie-like at the TV because there’s actually nothing on worth watching. Feed Charlotte, put her to bed (hopefully). Sit in front of the computer and stare zombie-like because there are a gazillion too many things to do and learn. Fall into bed way too late, turn off the light and sleep until a crying baby wakes you up.

Somewhere in there, if you’re lucky, you might also find time for breakfast and lunch and perhaps eating too much ice-cream. Going to the supermarket, taking the poor neglected dog for a walk, taking a shower, having a conversation with someone other than a four month old, checking your emails, buying your nephew a long overdue birthday present, working on some client consultations, working on some furniture refurbishments, working on some decorating projects for your own home. Baking choc chip cookies, paying bills, making your bed, cleaning your car (yeah, right), tackling your jungle of a garden (yeah, even bigger right!), visiting the doctor, doing fifty sit ups, making lists of things to do that never seem to get done and pondering just how you can improve your blog (which is still your favourite cathartic indulgence) without paying a graphic designer cause you’re too stingy.

And I only have ONE kid. My gosh, women astound me!


Okay, so that kinda makes me sound like a complete scatter-brain though in all fairness I'm actually reasonably well organised thanks to my OCD (Organization Compulsive Disorder).
It's just that, with every one thing I do get done there are a million other things I wan't to get done.
Anyone relate? More than half the world's population I'm sure.

So now, venting complete, on to the decorating section of this post.
Along with my weird obsession with carpet grain I also have a less weird love for ticking stripes.
And when I was in hospital for two months recently I did what any other bored in-patient with wireless internet might do - shopped online!


I must have been craving the comfort of my own distant bed so when I found this gorgeous black and white ticking sheet set on EziBuy I bought it with the promise of coming home to something nice and new.
They are 100% cotton though feel much softer (almost like a flannel).

I love them paired with my quilted doona cover and gilt headboard frame.


They just add that little extra something plain white bedding sometimes lacks.


Oh, and on a different side not, sorry for all my long vertical photos lately. The rooms in my house are just all so small that I have to shoot a lot of my photos through doorways then crop them all down.
I'm not complaining though, the smaller the house, the smaller the cleaning effort!

And now, just cause I'm loving it so much at the mo' here's some more ticking inspiration....

Country Living

Via M Street

House Beautiful

Unknown

House Beautiful

Unknown

Via Cocozy

Country Living


Rabu, 11 November 2015

Chalky Washed Armoire

Thanks so much for all the lovely comments about my bedroom revamp.

One of the most mentioned and asked about items was the armoire. Well, 'armoire' is perhaps a bit too fancy, it's just a plain standard robe really.


It was funny to read all the different comments eluding to its colour. Most of you thought it was a shade of blue, others blackey-grey and one of my friends who actually saw it in person was convinced it was green! Well, one of those is kinda right so read on to discover the actual colour and how I achieved the finish.

Before

I picked this robe up for $90 off eBay. It was basically brand new and perfectly sized for the little nook in my bedroom. It was just a tad too "piney".

Remember my inspiration board:

Even though the armoire I included was charcoal I ummed and ahhed for ages about what colour to finish my robe in. I eventually decided to stick with black to play off the white bedding and cream walls and add some depth and drama. So, after two coats of acrylic black and one acrylic seal coat I popped the robe in my bedroom...and hated it! It looked far too crisp and contemporary for the soft, relaxed feel I was going for.

Enter plan B. I carted the robe back outside and sanded it down hard all over, paying extra attention to the edges, then popped it inside again...arghh, still not right!

Plan C. Stuff taking it back outside again! I diluted some french grey acrylic paint with water (about 50/50) and working in sections - yes, right there on my bedroom carpet (I did put an old towel down) - used a cloth to wipe it on paying special attention to any nooks and crevices. I then wiped it back off again with a damp rag in the direction of the grain.


And it worked! After three or four coats I achieved the level of lovely soft chalkiness I was after (oh, and a very fashionable french grey palm too - mental note, wear gloves next time).


I had never attempted a faux finish like this before and kinda just made it up as I went along though it was super easy and the result is awesome (if I do say so myself :-) so I highly recommend just giving it a go!
To finish I simply added some new antique brass hardware and hey presto...

Before

After

So, I guess it's technically charcoal in colour though depending on the light it can look blue, grey, black or even green!


Sabtu, 07 November 2015

The Painted Hive Master Bedroom

MB 2010 (149)

MB 2010 (154)

MB 2010 (171)

MB 2010 (27)

Some interesting wall angles and the need for tonnes of storage really dictated the design for our master bedroom. Function and budget were high priorities so I decided to work 'pretty' around 'practical'. The neutral palette combines loads of natural texture with vintage elements for a relaxed yet fresh feel. While there are still a few additions I'm considering (bench seat, gilt mirror, another piece of art or two - oh, and my task lamps!) I'm pretty happy with how it's coming along. I’m also waiting to put some finishing touches on the built-in robe doors and will share the after pics of them soon too.

So, here’s the floor plan just to give you an idea of the room’s weird shape (BED 1):
Floor Plan

And here's the space before (cringe!):

2009 Bedroom (9)

2009 Bedroom (12)

Robe Before (6)

2009 Bedroom (10)

Well, that was after we already simplified the canvas by painting out the green walls and brown trim (Dulux Chalk USA on the walls, Dulux White Watsonia on the trim), replacing the dirty old carpet and removing the completely translucent ultramarine blue curtains!

If you've been following this makeover from the beginning, aside from being incredibly patient :-), you should also recognise a fair bit of the decor.
(If you missed any or all of the lead-up posts you can catch them here where you can read about, amongst other things, how I created the massive map, made my linen throw and cushions, came up with an attractive blackout window treatment solution and used gift wrap for wall art).

Pretty much all of the decor has been thrifted, bought on clearance or hand-made and every piece of furniture in the room is second-hand. Here it all is pre-makeup:

Bedroom Befores Collage

(To avoid a massively lengthy post I'll cover each refurb in more detail in separate posts shortly).

Now, if like me you love a good before and after you’ve come to the right place!

Before
Wardrobe Before

After
MB 2010 (115)

Before
Shoe Cabinet Before

After
MB 2010 (49)

Before
Commode Cupboard Before

After
MB 2010 (141)

Before
Chest of Drawers Before

After
MB 2010 (144)

Before
Massive Picture Before

After
MB 2010 (173)

Before
2009 Bedroom (12) - Copy

After
MB 2010 (171)

And just cause I can’t help myself here are a few little detail shots too:

MB 2010 (29) MB 2010 (41)

    MB 2010 (140)     MB 2010 (87)

If you’re interested in some further info about this room makeover, including the item origins and cost breakdown, keep an eye out for some separate future posts.

Have a great week everyone!