home decor ideas

Tampilkan postingan dengan label Before and After. Tampilkan semua postingan

Selasa, 01 Desember 2015

Enhanced Natural Timber Furniture

Before I began my master bedroom revamp I knew I wanted some rustic timber to keep the space warm and grounded however finding the right pieces to 'restore' rather than 'refurb' is easier said than done.
We all know how easy and effective slapping a fresh coat of paint on a piece of furniture can be - not only does it completely transform the feel of an item though it can also hide a myriad of sins. So, when you're planning on paring-back rather than packing-on, a little more care (and/or blind faith!) may be required.
With that in mind I set about sourcing some second-hand timber pieces which would eventually become my bedside tables and finally found these on eBay:

Deco Dresser ($60)

Kauri Pine Cupboard ($50)

Because my bed doesn't sit centrally on the wall I wanted two pieces with mis-matched proportions to play off the asymmetry of the room. I also needed plenty of storage.

Remember my inspiration board:

I knew I was dreaming when I included that apothecary style cabinet (lower right) though thought I could somehow transform my crappy old deco dresser into something with a similar feel so I got to work.

First I removed the mirror and handles then stripped back the old varnish using my secret weapon; commercial grade graffiti remover. Seriously, this stuff is awesome! You just pour a layer on, leave it for five minutes then remove it with some soapy water and steel wool. It's soooo much easier and faster than using a conventional paint stripper.
Okay, so admittedly I get mine from a friend in the industry though I'm sure it's available somewhere for domestic use (sorry I can't help more :-).

I next gave the dresser a light all over sand then stained it dark using a combination of walnut and black. I was careful to get the stain into all the imperfections in the timber to create the look of an aged patina. To finish I sealed it with three coats of danish oil then added some library pulls.

Before

After


The pulls were originally shiny polished brass so I coated them with some old gold Rub 'n' Buff to create a tarnished look. I thought it may not stick given how smooth the surface was though it hasn't budged. For something different rather than label each pull with a numerical digit I used french written numbers (un, deux, trois, quatre, cinq, six, sept, huit) which I simply printed off my computer onto regular copy paper. I then stained the paper with a diluted coffee mixture to give the labels an aged appearance.


My original plan with the kauri pine cupboard was to keep it as is though the blonde timber looked too unbalanced against the walnut of the dresser so I decided to stain it dark too which was fast and easy because it was already so bone-dry no stripping or sanding was needed. I simply mixed up some walnut and black timber stain then gave it three good coats. There were heaps of gouges and grooves in the soft timber from years of love (and neglect!) so, as with the dresser, I was careful to let the dark stain penetrate all the imperfections to create an aged-looking, time-worn patina.

Before

After

Linking this post with some of these parties.


Selasa, 24 November 2015

Library Card Cabinet Upcycle


Whatda you do when you come across something you really love?
Something for your home that you know there is no practical place or use for?
Do you buy it just because?
Just because you might never come across one again? Just because it was a really good price? Just because your mother's sister's second cousin Mavis had one just like it? Just because you could remove that, paint this, add some of these and turn it into an umbrella stand?

Well, a while ago I blogged about this old library card cabinet I bought 'just because'.


It sat in my junk room serving absolutely no purpose for about a year until the arrival of Charlotte saw my junk room (which was the temporary home for many of my 'just because' items) become sole real estate for one beautiful bouncing bambino.

(You can see the nursery makeover here if you missed it)

So, with our shortage of storage space made even shorter it was finally time to let some things go, starting with my card drawer cabinet.

Before selling it though I decided a mini makeover was in order.

Rather than paint over the character-filled timber I simply gave it a good all over clean and oil (just with furniture polish) to retain and enhance the original patina.


I also attached some solid metal castor wheels (as I had always originally intended). Along with the advantage of mobility the wheels also add enough height to give the cabinet perfect proportions for a coffee or deep side table.


I could only find silver steel castors which looked too modern paired with the old cabinet so I tinted them black to resemble cast iron.
Here's a little trick; rather than use spray paint (which easily chips off smooth metal) I coloured the wheels with a black permanent marker!


It sounds time-consuming though it was actually really quick and so far has held up great. Whilst I imagine it will likely fade a little over time where the wheels roll it will probably look nicely worn rather than just plain chipped.

So, mini refresh complete, I re-arranged my living room a bit to plonk the cabinet beside my leather couch to take some photos for the eBay listing and....


....I'm kinda loving it!


Luke even made the rare comment that he also liked it!


Did I say we have a shortage of storage space and it was time to let some things go? Well, maybe not this...for now anyway.

Hmmm, perhaps I should stop buying stuff 'just because'.

Linking up here.


Rabu, 18 November 2015

Distressed White Cabinet


Remember this little guy from my bedroom reveal?

Before

After

I reckon this early 1900's cabinet was originally some kind of kitchen dry store or food safe though I picked it up for $60 off eBay knowing it would be a perfect new house for all my shoes (oh, and some of Luke's too I spose - if I really have to share. Nah, actually I think he probably has more than me!).

This was the simplest of makeovers. I really wanted to retain the chippy, shabby appeal of the finish and although it might look fine as is in the before pic it was actually kinda dirty and cruddy so all I did to enhance its charm was give it a thorough once-over with the palm sander. Easy! I didn't even bother sealing it.


To finish I simply attached a couple of new el-cheapo tear drop handles from the hardware store.


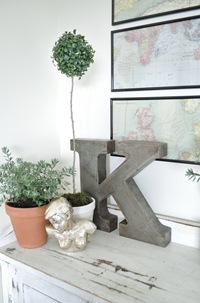
The adorning vignette features my gift wrap wall art, a giant gal 'K' and rectangular box from Provincial Home Living, terracotta potted rosemary plants, my DIY stick topiary (complete with real moss I pinched from the garden) and thrifted rustic bird cage and silver bust.


Senin, 16 November 2015

The Industrial Dining Room Light

Thanks for all the comments about my little dining room makeover.
I got a lot of questions about the light fixture so thought I'd post about it sooner rather than later.


I'd been inactively looking to replace both the original fixtures in my conjoined living-dining room since we moved in.

BEFORE

Yep, that was them. Except they were originally green and bright gold so not long after we moved in I painted them antique bronze mainly just so I didn't have to think "Aussie, Aussies, Aussie, Oi, Oi, Oi" every time I looked at them.

I knew I wanted something industrial-ish to replace them with though it took me five years to actually do it because....
One; finding stylish and affordable pendants here in Oz isn't easy.
Two; I needed two fixtures. A single pendant above the dining table would have been easy enough though I had to consider the aesthetic of having two within around three meters of one another.
Three; Our ceilings aren't high. And whilst having a low-hung pendant above a dining table is no problem I needed it to match the height of the pendant over the living area otherwise it just woulda looked plain bad. Long story short, it needed certain proportions.
Four; Last Monday I had a photographer at my house to take pics for a potential future magazine feature so that kinda motivated me!

Luckily, the magazine shoot just happened to coincided with the release of a new stylish and affordable lighting range from Recollections.


I'm sure many of my fellow Aussies feel the same quiet longing for the seemingly endless array of affordable stylish homewares available overseas, particularly in the USA, so I was wrapt when I came across this new collection. Finally, a slice for us (albeit small though a slice none-the-less!).

I got two of the Grantham pendants (usually $99 each) for $160 for both as they currently have 30% off your second pendant. I also sold both my old light fittings for $60 so if you take that off the price for the new ones I technically got them for $100 which is just $50 a piece!

Hubby Luke installed them for me and I'm really pleased with how they look.
And, new light aside, I've made other changes in the living area so will share them too when I get around to it :-)


PS If my house does happen to turn up on the pages of a magazine sometime I'll let you know once I've picked myself up off the floor!

Rabu, 11 November 2015

Chalky Washed Armoire

Thanks so much for all the lovely comments about my bedroom revamp.

One of the most mentioned and asked about items was the armoire. Well, 'armoire' is perhaps a bit too fancy, it's just a plain standard robe really.


It was funny to read all the different comments eluding to its colour. Most of you thought it was a shade of blue, others blackey-grey and one of my friends who actually saw it in person was convinced it was green! Well, one of those is kinda right so read on to discover the actual colour and how I achieved the finish.

Before

I picked this robe up for $90 off eBay. It was basically brand new and perfectly sized for the little nook in my bedroom. It was just a tad too "piney".

Remember my inspiration board:

Even though the armoire I included was charcoal I ummed and ahhed for ages about what colour to finish my robe in. I eventually decided to stick with black to play off the white bedding and cream walls and add some depth and drama. So, after two coats of acrylic black and one acrylic seal coat I popped the robe in my bedroom...and hated it! It looked far too crisp and contemporary for the soft, relaxed feel I was going for.

Enter plan B. I carted the robe back outside and sanded it down hard all over, paying extra attention to the edges, then popped it inside again...arghh, still not right!

Plan C. Stuff taking it back outside again! I diluted some french grey acrylic paint with water (about 50/50) and working in sections - yes, right there on my bedroom carpet (I did put an old towel down) - used a cloth to wipe it on paying special attention to any nooks and crevices. I then wiped it back off again with a damp rag in the direction of the grain.


And it worked! After three or four coats I achieved the level of lovely soft chalkiness I was after (oh, and a very fashionable french grey palm too - mental note, wear gloves next time).


I had never attempted a faux finish like this before and kinda just made it up as I went along though it was super easy and the result is awesome (if I do say so myself :-) so I highly recommend just giving it a go!
To finish I simply added some new antique brass hardware and hey presto...

Before

After

So, I guess it's technically charcoal in colour though depending on the light it can look blue, grey, black or even green!


Senin, 09 November 2015

Tolix Chairs for the Dining Room!

Have I mentioned my complex? The one about buying furniture brand new?
Seriously, I mean complex. The whole concept is just an enigma to me.
Don't get me wrong though, I know second-hand is not always the best way to go though if I happen to spy you buying something so generic they sell one every five seconds on eBay for just fifty cents please forgive me for wrestling the credit card from your hand!
My sister does it all the time and it drives me nuts. Luckily she's my sister so I'm allowed to wrestle her.

Anyhoo, I faced my fears last week and couldn't be more pleased with the result....


Four brand new tolix replicas now grace my dining room, making perfect companions for my rustic farmhouse table.


With their low slung backs, sleek lines and robust gal finish not only are they beautiful, though as one of my readers pointed out, they are also perfectly child proof!
I did a fair amount of research to find a local supplier with the best price and ended up getting all four chairs for around $450 AUD. Not too bad.


The hammer hasn't yet fallen on the auction for my previous IKEA chairs though whatever they sell for I'm gonna mentally take it off the total price of the new chairs - it just makes me feel better.

So, here's my dining room around this time last year...


And here it is today...


Last year...


Today...


Did you catch a few other new details in there too?
I've been tizzy-ing up a storm lately and will post further details soon.

So, as a self-confessed newfurnitureneurotic who's not overly convinced that buying pre-loved can't be applied in every instance, in this case I reckon brand new was the way to go.
And until the tolix replicas make their way onto the second-hand market it's a heck of a lot cheaper, if not quite so prestigious, than forking out for the current pre-loved ones on offer (I'm not saying I wouldn't love some gorgeous Xaviar Pauchard originals though!).

Linking up here.


Sabtu, 07 November 2015

The Painted Hive Master Bedroom

MB 2010 (149)

MB 2010 (154)

MB 2010 (171)

MB 2010 (27)

Some interesting wall angles and the need for tonnes of storage really dictated the design for our master bedroom. Function and budget were high priorities so I decided to work 'pretty' around 'practical'. The neutral palette combines loads of natural texture with vintage elements for a relaxed yet fresh feel. While there are still a few additions I'm considering (bench seat, gilt mirror, another piece of art or two - oh, and my task lamps!) I'm pretty happy with how it's coming along. I’m also waiting to put some finishing touches on the built-in robe doors and will share the after pics of them soon too.

So, here’s the floor plan just to give you an idea of the room’s weird shape (BED 1):
Floor Plan

And here's the space before (cringe!):

2009 Bedroom (9)

2009 Bedroom (12)

Robe Before (6)

2009 Bedroom (10)

Well, that was after we already simplified the canvas by painting out the green walls and brown trim (Dulux Chalk USA on the walls, Dulux White Watsonia on the trim), replacing the dirty old carpet and removing the completely translucent ultramarine blue curtains!

If you've been following this makeover from the beginning, aside from being incredibly patient :-), you should also recognise a fair bit of the decor.
(If you missed any or all of the lead-up posts you can catch them here where you can read about, amongst other things, how I created the massive map, made my linen throw and cushions, came up with an attractive blackout window treatment solution and used gift wrap for wall art).

Pretty much all of the decor has been thrifted, bought on clearance or hand-made and every piece of furniture in the room is second-hand. Here it all is pre-makeup:

Bedroom Befores Collage

(To avoid a massively lengthy post I'll cover each refurb in more detail in separate posts shortly).

Now, if like me you love a good before and after you’ve come to the right place!

Before
Wardrobe Before

After
MB 2010 (115)

Before
Shoe Cabinet Before

After
MB 2010 (49)

Before
Commode Cupboard Before

After
MB 2010 (141)

Before
Chest of Drawers Before

After
MB 2010 (144)

Before
Massive Picture Before

After
MB 2010 (173)

Before
2009 Bedroom (12) - Copy

After
MB 2010 (171)

And just cause I can’t help myself here are a few little detail shots too:

MB 2010 (29) MB 2010 (41)

    MB 2010 (140)     MB 2010 (87)

If you’re interested in some further info about this room makeover, including the item origins and cost breakdown, keep an eye out for some separate future posts.

Have a great week everyone!